Keystone Pro Hardware Wallet Review: Why Buy It?
You may have heard the buzz on how hardware wallets are the most secure wallets to store your cryptocurrencies. Well, that is quite true.
And If you are on the lookout for one of the best hardware wallets out there, STOP your tracks here and let us explore why the Keystone Pro hardware wallet is topping the charts.
The Keystone Pro is one of the best hardware wallets that you can use to keep your cryptocurrency without the internet.
It is an air-gapped gadget. This means it can not be connected to the internet, making it immune to malware or virus infection.
Even your private keys are stored with a secure element to ensure they are never exposed to the internet.
There are a lot of exciting features in the Keystone Pro Hardware wallet; how about we go over them one feature at a time? You’ll like that, right? Cool, then let’s get going.
Keystone Pro Hardware Wallet Review
| Category | Review |
| Price | The Keystone hardware wallet costs $169.00 |
| Available Cryptocurrencies | Over 5,500 (view the full list of supported coins) |
| Supported blockchains | Over 200 |
| Supported software wallets | 25+ |
| Mobile App | iOS and Andriod |
| Security features | Open source firmware, Dice entropy, Multi-sig support, Shamir backup, Fingerprint sensor, Self destruct mechanism, Air-gapped design |
| Unique Features | Air-gapped communication, Color touchscreen, Fingerprint sensor, Multiple BIP support, Camera |
Let’s properly dissect these unique features, shall we?
Great!
Here’s a brief rundown of each of them.
Air-gapped Communication
The Keystone Pro wallet speaks to your computer with QR codes, which means that it is air-gapped.
In other words, your private keys are never revealed to your computer and that makes it an impossible mission for hackers to steal them.
Touch Screen
The Keystone hardware wallet Pro can be operated by simply tapping the screen, and with that, you can easily navigate the user interface and complete transactions.
Fingerprint Sensor
The Keystone Pro has an in-built fingerprint sensor to allow you to authenticate transactions, and it also serves as an additional layer of security to the wallet.
Multiple BIP support
Almost all hardware wallet supports the BIP39 standard. This is how most crypto wallet seed phrases are forged.
However, Keystone uses BIP32, BIP44, and BIP39 standards, which makes it a remarkably diverse wallet that can support multiple seed phrases.
Camera
This is not like the fancy square or circle we have at the back of our phones for taking shots.
Its function is scanning QR codes to help you merge your wallet with a compatible software wallet or Keystone’s very own app so you can manage your funds.
Open Source Firmware
The Keystone wallet’s firmware is open source, which means that it can be audited by security experts. This ensures that the wallet is protected and that there are no secret loopholes.
Self-Destruct Mechanism
If the Keystone wallet is ever lost or stolen, you can trigger the self-destruct mechanism to obliterate all of your private keys. This will hinder anyone from being able to access your cryptocurrency.
Dice Entropy
The Keystone wallet generates its random numbers by using dice entropy. This makes it more like finding a needle in a haystack for hackers to predict and steal your cryptocurrency.
Multiple Signature Support
The Keystone wallet allows multiple signatures to verify a transaction. This prompts you to fill in multiple signatures before your transaction can be authorized.
Shamir Backup
The Keystone wallet supports Shamir backup. This helps you split your private keys into multiple parts and keep them in different locations.
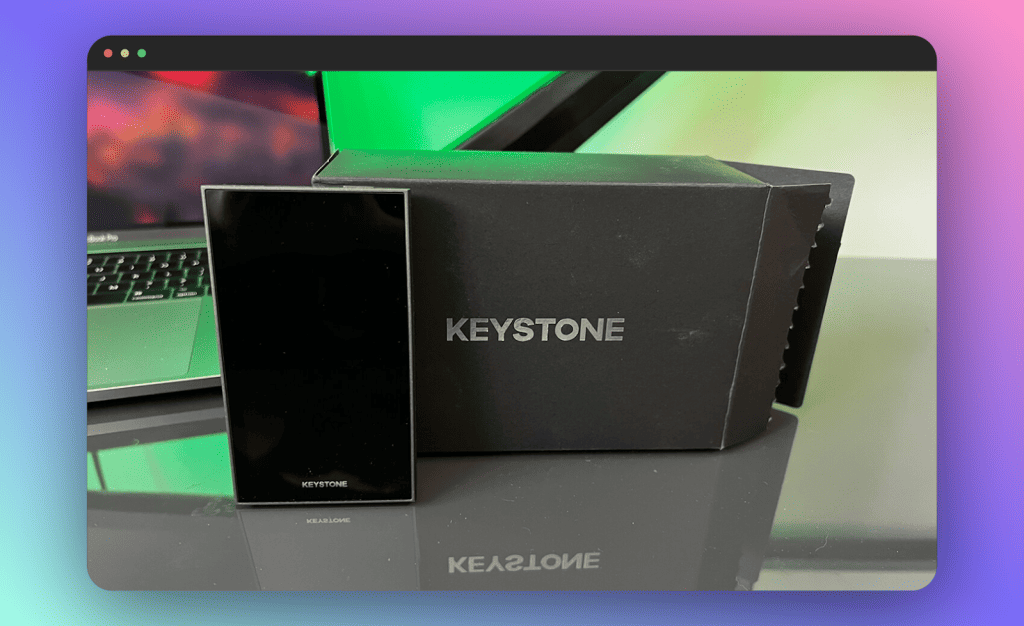
Keystone Pro Unboxing: What’s In The Box
Now it’s time to unbox and see what is in the pack.
When you unbox, you will observe two boxes. They are both presented in a plastic seal with a space to tear open at the side.
The box that holds the device has a security tape to secure the packaging and the tape is keystone branded to show it hasn’t been tampered with.
Now, let’s roll into what these boxes hold.
Box 1
- Keystone Pro device
The Keystone Pro device measures 60 x 35 x 12 mm and weighs 45 grams
- A Lithium battery of capacity 10mAh
Box 2
- 100cm long USB-C cable
- Quick start guide
- Three Recovery phrase cards
The recovery phrase cards are made of metal and are water-resistant. They hold 24 words which serve as your recovery phrase if you ever need to restore your wallet
- 8 GB micro SD
- Warranty card
The warranty card holds all the information on the warranty for the device
To set up keystone pro fully, you will need some additional items (if they aren’t already in the box)
Here are the necessary things you will need to get your keystone pro up and running
- One micro SD card (at least 8GB)
- One micro SD card adapter
- One micro SD card reader
- One Macbook USB adapter (just in case your Mac doesn’t have a USB port)
With these, you are ready to begin your Keystone Pro hardware wallet adventure
Pros And Cons Of Keystone Pro
| PROS | CONS |
| High security | Not as user-friendly as some other hardware wallets |
| Easy to use | Limited software support |
| Touch screen and fingerprint sensor | It Doesn’t come with a micro SD card sometimes |
| Supports a wide range of cryptocurrency | Some users have reported firmware issues |
| Affordable | |
| Compatible with over 10,000 coins and tokens |
How to Set up and Use the Keystone Pro Hardware Wallet
Step 1: Perform the Web Authentication
- First, turn on the device and pick a language of your choice
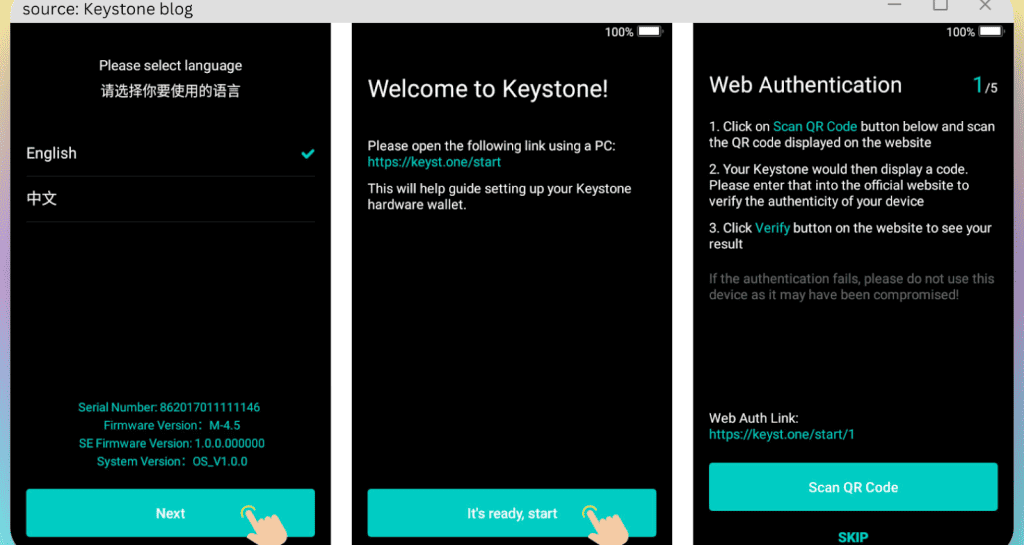
- Then, click ‘Scan QR Code’ and navigate to the Web Authentication Interface page to scan the QR code with your device.
- Copy out the 8-digit code that pops on your device onto the web page
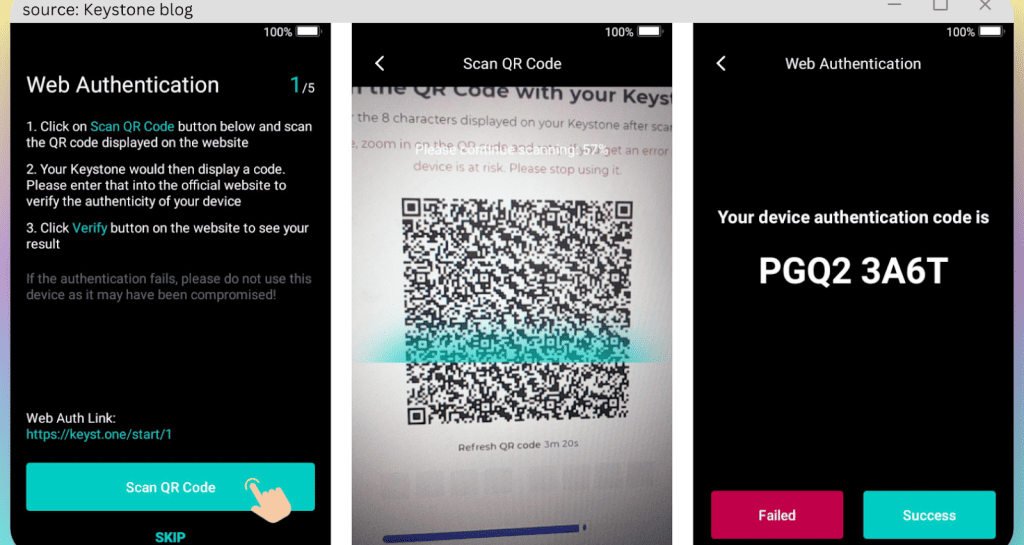
When you get a message that reads ‘Your Device is Secure’, click on “success” to complete the process.
- Next, you will be prompted to set up a password.
Step 2: Create Your Password
Your password must hold at least ten characters.
To ensure you set a strong password, try mixing it up with upper and lowercase letters, symbols, and digits.
Step 3: Format Your Micro SD Card to FAT32
Formatting your Micro SD card makes it easy to upgrade your firmware without any complications. That would save you the stressful merry-go-round. Let’s get into it.
How to Format Your MicroSD Card to FAT32 on a Mac
- Link your Micro SD card to your Mac
- Open ‘Applications’
- Select ‘Utilities’
- Pick “Disk Utility”
- You get to see all your devices in the sidebar when you click Disk Utility. Then tap on the Micro SD you want to format to FAT32.
- Choose ‘Erase’ from the toolbar (or right-click and select erase)
- In the ‘Format’ box, pick ‘MS-DOS FAT’ from the drop-down menu
- Tap ‘Start’ to initiate the FAT32 format
How to Format Your MicroSD Card to FAT32 on a PC
- Connect your MicroSD card to your PC
- Navigate to File Explorer, and click on the USB drive
- Tap “Format”
- Use “FAT32” as the target file system
- Select “Quick Format”
- Tap ‘Start’ to begin the FAT32 format
Bravo! That’s all you need to get it all set up. Not so techy, huh?
Step 4. Upgrade Your Firmware
This step is required because it lets you take advantage of new features. Let’s get right into it
- Attach the microSD card to your PC.
- Download the newest firmware file. There are two choices, you can either go for the multi-coin firmware or the BTC-only firmware
- However, you should note that when your device is placed on the BTC-only firmware, it will be impossible to make a switch back.
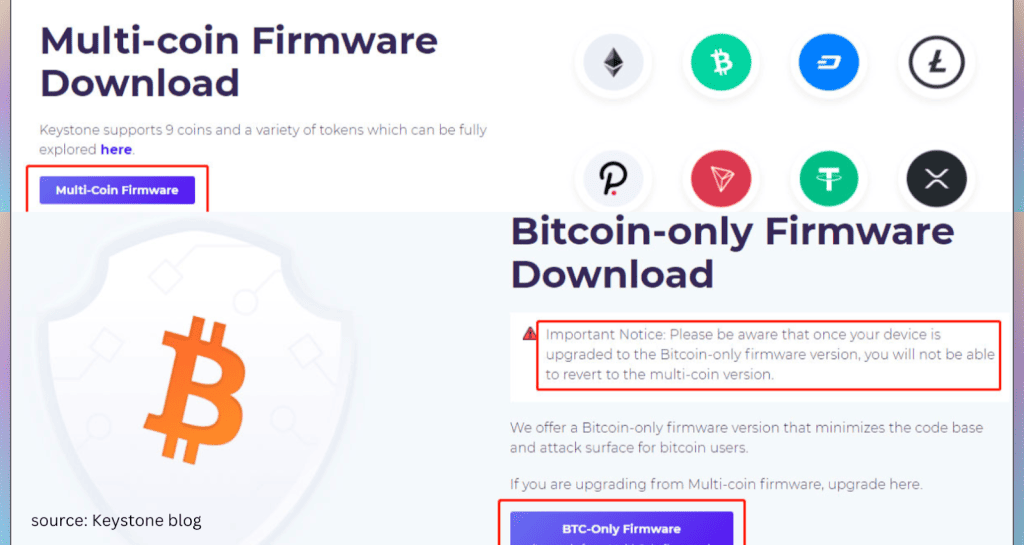
- Unzip the just downloaded file and right-click to copy the “update.zip” file to your microSD card. Ensure you paste it into the root directory.
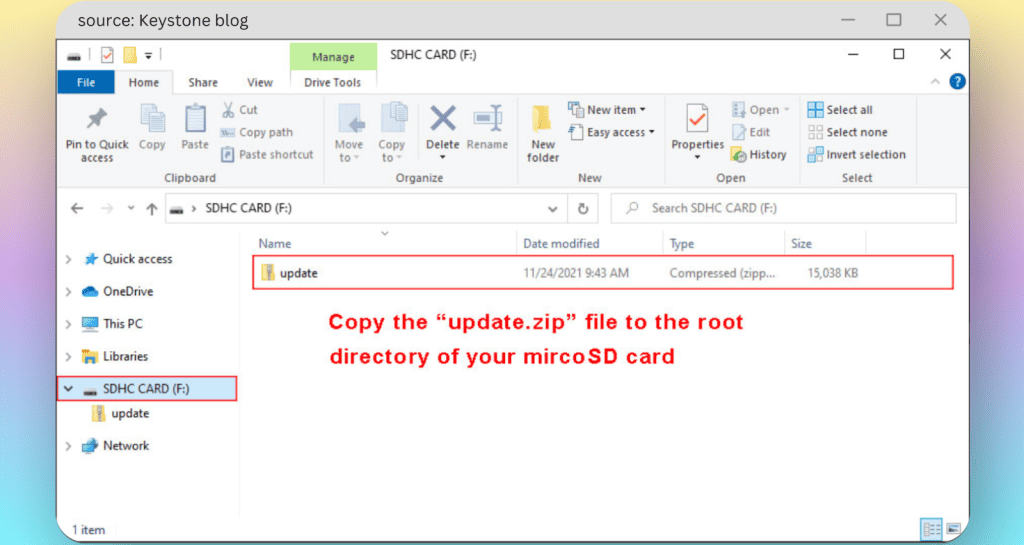
- Disconnect your microSD from the computer and insert it into the Keystone Pro hardware wallet device.
- Then, click “Update Now” > Navigate to “sha256” and tap “Update Now” > input your password to start the update.
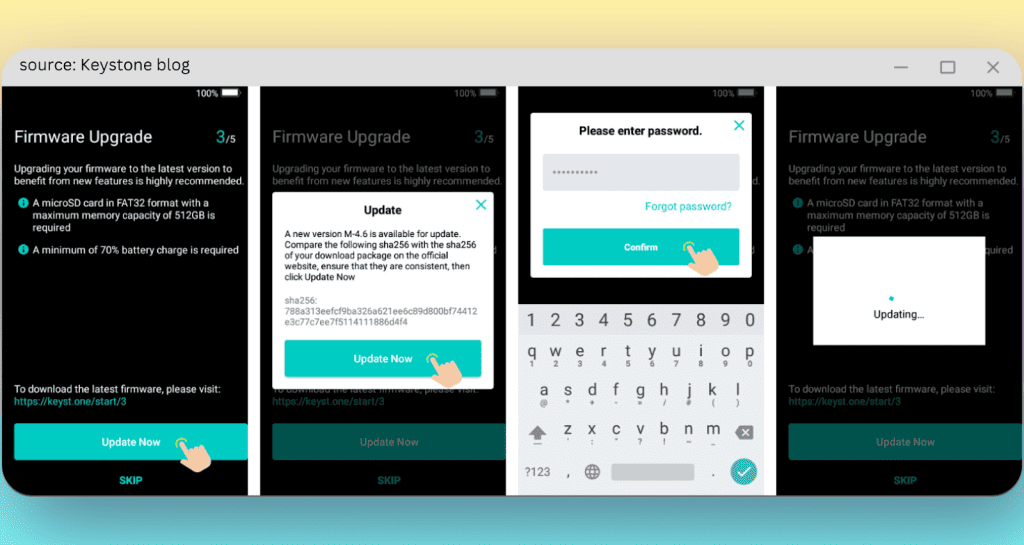
Step 5. Open a wallet or Import Your Previous one
1. Creating a Wallet
If you would like to generate a new recovery phrase or don’t have one, then click
- “Create Wallet”
- Enter your password and pick “Confirm”, then select “Create a Wallet with Single Backup” > “I UNDERSTAND”
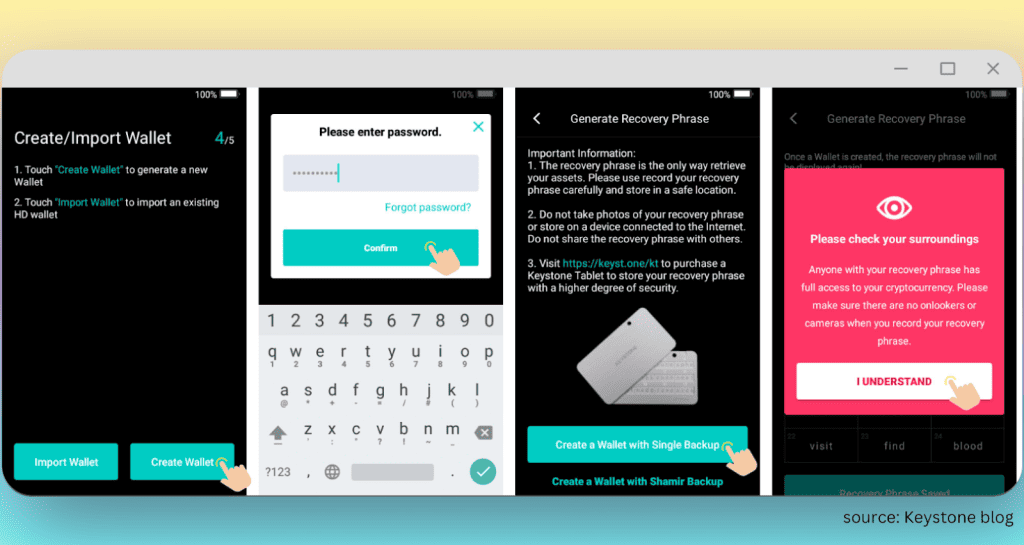
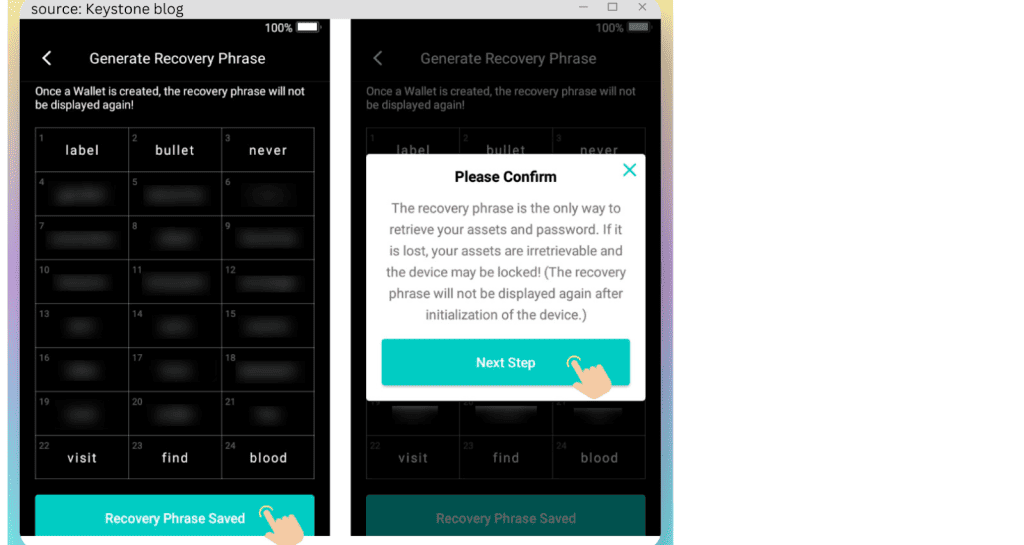
- Painstakingly record the recovery phrase as it pops on your screen. You may opt for the metal tablet for more durability.
- Tap “Recovery Phrase Saved” > “Next Step”.
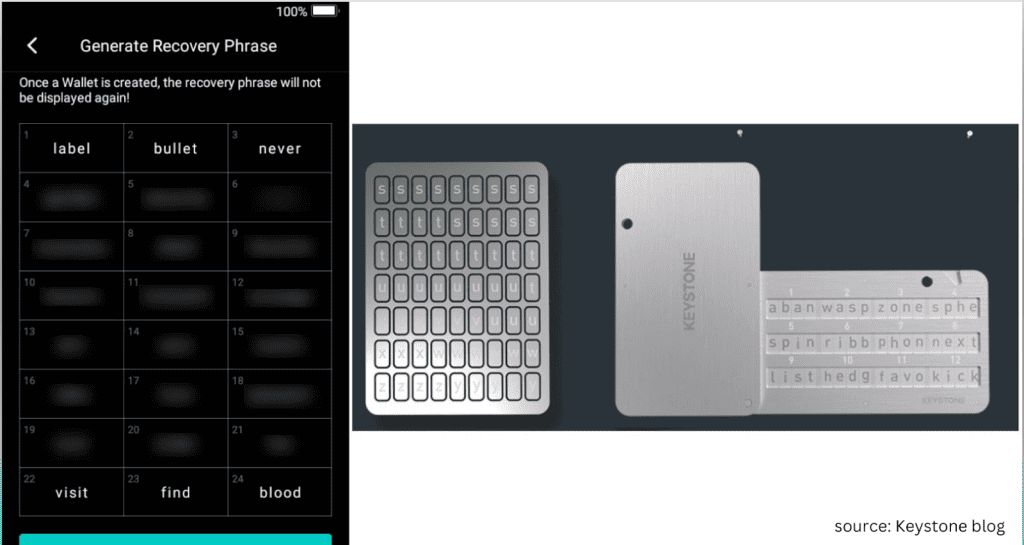
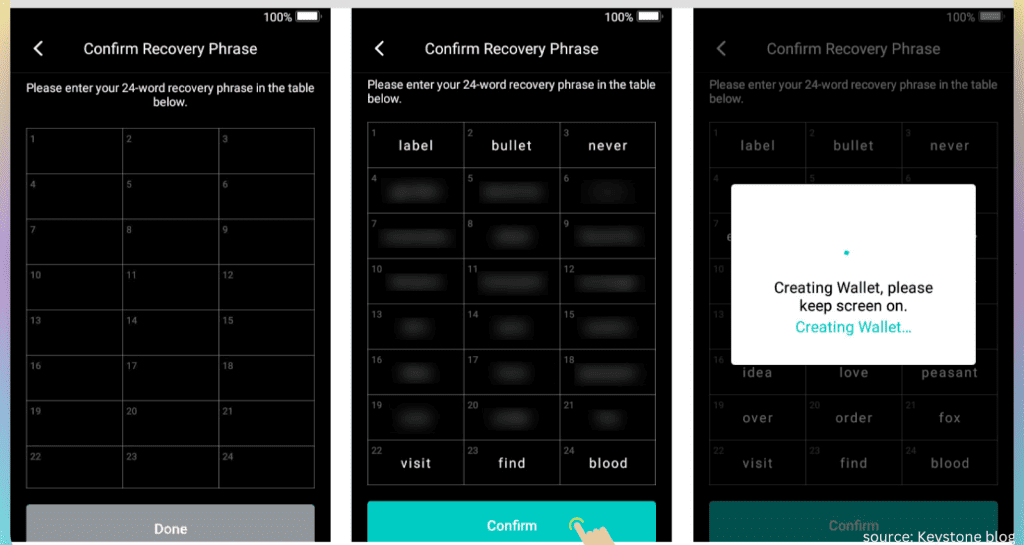
- Put in the 24 seed phrase and tap “Confirm” to generate the wallet.
2. Import an existing Wallet
If you want to add your previous wallet, then
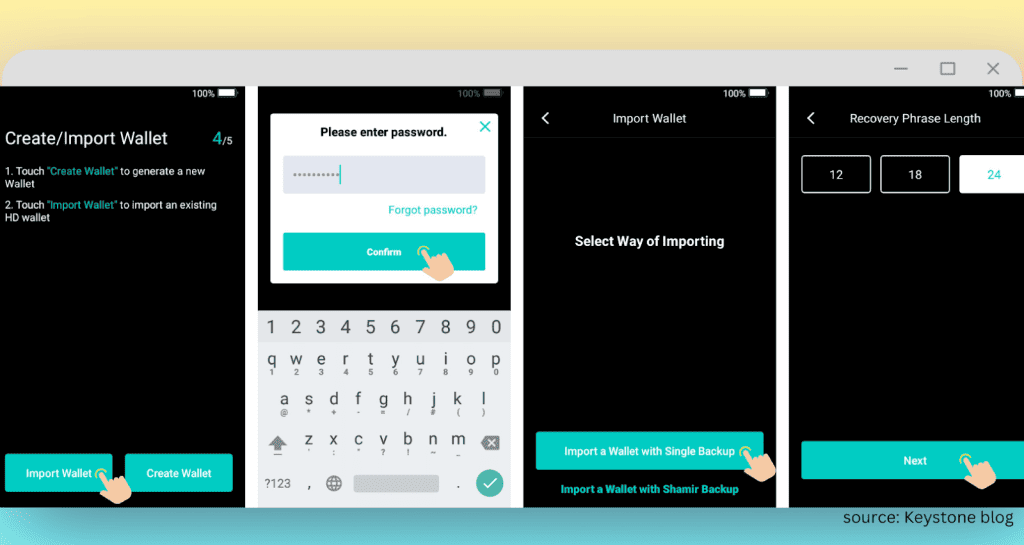
- Tap “import wallet.”
However, you can generate a new recovery phrase since using an existing one can expose you to various security risks.
- Click “Import Wallet”, then type your password and click “Confirm” > “Import a Wallet with Single Backup,” then
- Pick your secret phrase length and select “Next.”
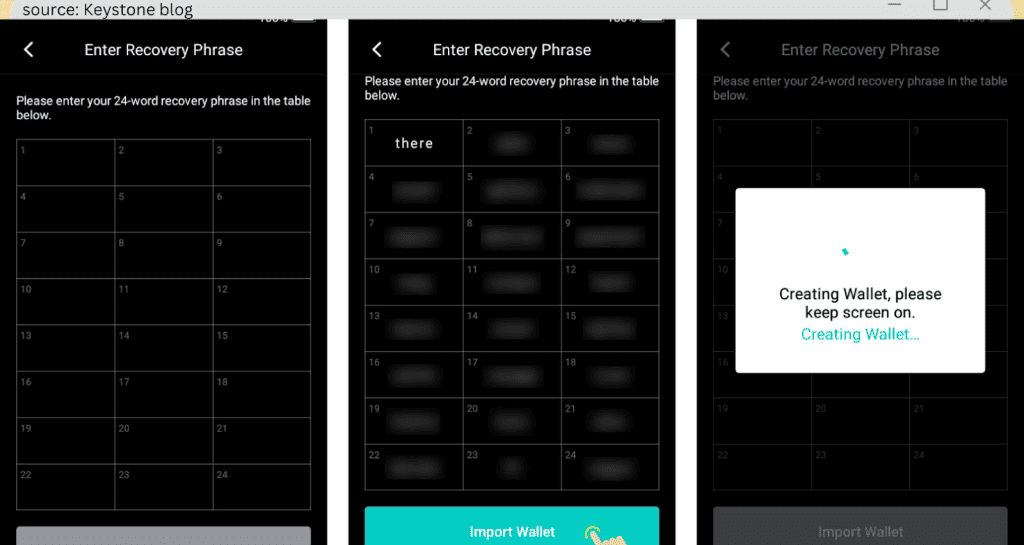
- Input your recovery phrase. Select “Import Wallet” to complete your wallet importation.
Step 6. Choose the Suitable Companion App and Add Assets
After you are through with creating/importing a wallet on your keystone device, it’s time to integrate a companion software wallet to help you view your balance and make transactions.
1. Pick an ideal software wallet based on your preference. I will be using the “Keystone Companion App” for this demonstration.
2. Choose the “Cryptocurrency” you would like to manage and click the tick icon on the top right side of the screen.
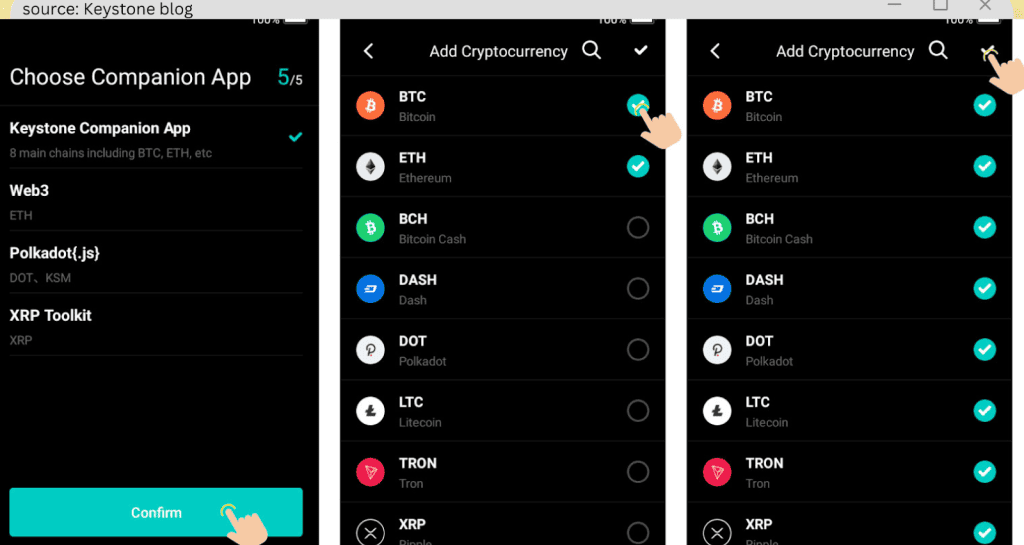
The Keystone hardware wallet supports the exhibition of major cryptocurrencies.
However, you can manage and add Tokens through the Keystone mobile app.
What are People Saying about Keystone Wallet?
It’s exciting to read the technical facts of keystone hardware wallet pro, but hearing from those who have used the device gives us a clearer picture of what to expect.
What do you say we add some human factor to this review? Cool, let’s dig into what folks said regarding the Keystone Pro hardware wallet.
“Fantastic information about this cold wallet I love this I have got myself a Keystone pro and I can’t wait until it gets to the UK so I can take the crypto of my ledger onto this Keystone cold wallet also I love the fact you can put NFT as your wallpaper. 😀I see this going big also they will never mess with your information and keys and you can 100% trust Keystone.”
“Ordered with the free shipping option. Shipped the same night, delivered the next business day. Amazing. Needed some help with setting up a few things. Support answers within minutes, 24/7. Awesome. Metamask, Keplr, Solflare, XRP support. Complete air-gapped security. Incredible.”
“Keystone support stayed with me through several emails as I became more frustrated about why I could not get the firmware update to work. This was due to me not pushing the micro SD card in all the way (which can’t be done with fingers only, but needs a push with a flat object).”
Keystone Pro vs Alternatives
| Feature | Keystone Pro | Keystone Essential | Ledger Nano X | SafePal |
| Price | $169 | $119 | $149 | $49 |
| Battery | Rechargeable | AAA batteries | Rechargeable | Non-rechargeable |
| Security Features | Fingerprint sensor, self-destruct mechanism | None | PIN code, 24-word recovery phrase | PIN code, 24-word recovery phrase |
| Compatibility | 10,000+ coins and tokens | Fewer coins and tokens | Over 1,600 tokens and coins | Over 2000 coins and tokens |
| Ease of use | Easy to use | Easier | Easy to use | Easy to use |
| Bluetooth | No | No | Yes | No |
| Display | 4-inch colour touchscreen | None | 2-inch monochrome OLED display | 2.4-inch touchscreen |
Is The Keystone Wallet Worth The Attention? Final Thoughts
It matters a lot what your individual preference is, but if you are looking for a hardware wallet that is the most secure hardware wallet on the market with a color touchscreen and a fingerprint sensor, then Keystone Pro is your go-to wallet.
Frequently Asked Questions
Is the Keystone Pro wallet easy to use?
Yes, the Keystone Pro hardware wallet is easy to use.
It has a user-friendly interface, a touchscreen, and a fingerprint sensor that makes it easy to navigate the menus and smoothly authenticate your transactions.
How do you sign transactions using the Keystone Pro?
Follow these 7 steps to sign transactions using the Keystone Pro
- Enter the recipient’s address and the amount you want to send.
- Enter a transaction fee.
- click Sign, and Keystone will reveal a QR code
- Scan the QR code with your phone’s Camera…
- Enter your PIN or fingerprint to authenticate the transaction, and that will generate a signed transaction.
- Copy the signed transaction and paste it into the Keystone Pro app on your computer.
- Click Broadcast to send the transaction.
Can I import a recovery phrase generated by another wallet into Keystone?
Yes, you can import a recovery secret phrase forged by a different wallet into Keystone. To do this, follow the guidelines in the “creating a wallet” section of the article.
What Is The Difference Between Keystone Essential And Pro?
The main differences between Keystone Essential and Pro are the price, the display, the battery, and the security features.
Keystone Pro is more expensive than Keystone Essential, but it has a fingerprint sensor, a rechargeable battery, and a self-destruct mechanism.


